We want to create a Node.js app on a local Minikube cluster within Windows.
The website should output a simple string. If you want to learn more about Node.js, try out the hybrid app framework Ionic.
Your first cluster with Node.js
Node js works
Prerequisites: Your knowledge
Have programmed something … with Java, Python or any other programming language
Command line basics (or just copy the commands below 🙂 )
Admin rights to install and uninstall programmes
Technical requirements: What you need for your first Kuberenetes project
Windows 10 / 7 computer – This tutorial is designed for Windows computers
Admin rights
More than 5 GB RAM (better 12 GB)
Editor
Editor (Visual Studio Code)
In addition to the browser, you will need a code editor of your choice. You can use Notepad ++ as an alternative. It is best to use an editor with syntax highlights and IntelliSense, such as Visual Studio Code.
An important non-functional goal of a software system is to achieve (high) availability. The implementation of the microservice architecture with replication creates (high) availability.
A failure unit is an instance of a microservice that can crash in the event of a crash in the code. With a loose coupling, the crash of an individual failure unit does not affect the overall system
Continuous Integration / Continuous Development (CI / CD)
Roll out the new features of the software in small iterations in just a few hours
When a feature is finalised, the CI/CD process can automatically overwrite the old published installation.
Basics: Understanding Kubernetes basics
If you are dealing with Kubernetes for the first time, you will come across a lot of unfamiliar terms.
This section is intended to explain the most important concepts/terms as briefly as possible.
Read the following section to better understand the practical part.
The concepts of Kubernetes
With virtualisation in containers, a process is given its own runtime environment for executing the code. Different programs can run on the same physical computer with the containerisation of the code.
A pod is a type of virtual machine that provides all the technical hardware and software fundamentals required to run your code.
A container can hold one or more pods and represents a Kubernetes instance. A physical computer can run several containers in parallel. This form of dynamic server operation is resource-efficient.
The technology behind containers
The Hyper-V layer lies between the operating system of the virtual machine and the hardware. With Hyper-V, a virtual machine monitor, the user can limit the RAM size and CPU load for a virtual machine.
A virtual cluster of the same process is called a namespace. Kubernetes can run several virtual clusters on a physical real computer.
An image is a software package consisting of your code and the runtime environment.
Software projects for containers
Kubernetes manages, creates, scales and automates container applications. Google originally designed the application for its own purposes.
Docker enables the virtualisation of programs and operating systems in containers.
Helm is the Node.js for Docker containers. Helm provides ready-made Docker containers. The developer can create a ready-made runtime environment for Node.js “on the fly” without having to configure much.
Coding: Off into practice
Now it’s getting serious.
We will create your first container with these steps.
If you get stuck – write a comment with your error message in the comment field below.
What do we install in this tutorial
Kubernetes in the form of “Minikube” within the Windows operating system
If only “Hyper-V Requirements: A hypervisor has been detected. Features required for Hyper-V will not be displayed.” appears, you must install Hyper-V.
[Only if Hyper-V must be installed] Search for Add features in Windows and Windows will open a selection window:
02 Switch on virtualisation – Kubernetes Tutorial german Steffen Lippke Coding Lab
Wait for the installation preparations (1-10 min depending on computing power)
Restart the computer (3-20 min depending on computing power). The computer “imports updates” while Hyper-V is being installed.
04 Time to restart – Kubernetes Tutorial german Steffen Lippke Coding Lab
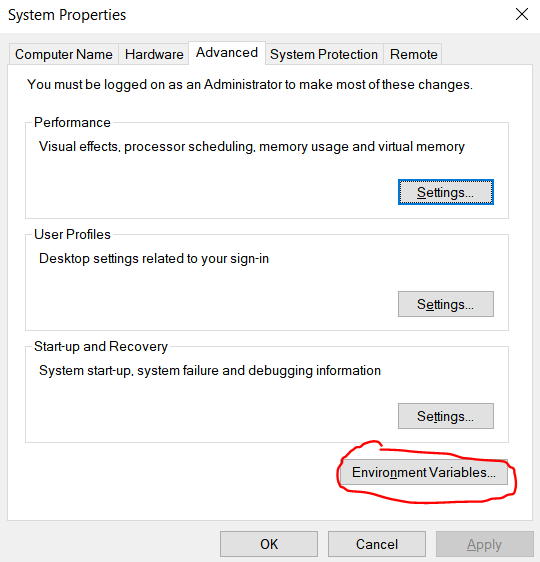
Set the Windows path for the .exe file so that Windows can find the kubectl command with the console. Search in Windows for the Set environment variable. Enter 2x under User and System Path in a new entry. The path entered should point to the .exe of kubectl. C:\Users\\Downloads
06 Add Kubectl Path
07 PATH for all
Log out and log in again to set the variables. (DO NOT LOCK AND UNLOCK – this is useless)
Open the CMD with admin rights and test the installation with kubectl version Start Minikube with minikube start (takes 1-15 minutes depending on computing power)
Open Visual Studio Code in this folder and create a helloServer.js
var http = require("http");

var handleRequest = function(request, response) {
  console.log("I have received a request from: " request.url");
  response.writeHead(200);
  response.end("Hello world - my first microservice is working!");
};
var webserver = http.createServer(handleRequest);
webserver.listen(8080);
… and a Docker image
FROM node:10
WORKDIR /usr/src/app
COPY package*.json ./
RUN npm install
COPY . .
EXPOSE 8080
CMD [ "node", "helloServer.js"]
Open the GIT BASH with admin rights. You will receive a Git Bash with your Git installation.
Restart Minikube minikube start
Then configure Minikube like this eval $(minikube docker-env)
Create a Docker image with docker build -t helloservernode .
14 Docker Build always takes a long time – Kubernetes Tutorial german Steffen Lippke Coding Lab
(takes 1-15 min depending on computing power and network)
Install the pod in the minicube kubectl run hello-foo --image=helloservernode:latest --image-pull-policy=Never
If the installation was successful, you can see with kubectl get deployments to see all installations on the minicube
To reach the pod outside the container with the browser, we need to set up a service with kubectl expose deployment helloservernode --type=LoadBalancer --port=8080
With kubectl get services you can see all services
Call minikube service helloservernode Your browser should open and show the website http://172.17.17.189:30392/
Done
15 Node js works – Kubernetes Tutorial german Steffen Lippke Coding Lab
Extensions: How can I extend the cluster?
Haven’t had enough of the Kubernetes tutorial?
Then add other clusters.
Replicate your container
Install additional pods next to the first one
Call up the Kubernetes dashboard
Connect two pods, e.g. Node.js frontend and Laravel backend
…
Conclusion: Congratulations on your first cluster
Containers are very versatile and scale well.
Try them out.
Write about error messages that occur …
Criticism with suggestions for improving the tutorial …
Installation problems of Kubernetes …
Thank you. I look forward to your feedback
Let us know what you think! Was this tutorial/post helpful, or do you still have burning questions? Write a comment and become part of our growing community. Share your successes, challenges and tips - together we can achieve great things in security and coding!


")

")


")


")

")


")

